Triaging Findings
A finished scan is the start of the work, not the end. A directory of a few thousand files easily produces tens of thousands of matches, and even a high-fidelity scanner like PII Crawler will surface some patterns that look like PII but aren't — sample data in a SQL fixture, a developer's test SSN like 123-45-6789, an email address in a vendor's license file. Triage is the process of separating real findings from noise so the remaining list is something you can act on: hand to legal, attach to a DSAR response, or route to a remediation queue.
This guide covers the triage workflow in both the TUI and the Web UI, the false-positive model (which is more flexible than a simple "ignore" flag), and how to export a clean report at the end.
The verdict model
Every match in a scan has a verdict: Unreviewed by default, and either True Positive or False Positive once you decide. Verdicts are persisted to the scan database, so you can pause and resume triage, and reruns of the same scan don't lose your work.
You can apply a verdict at four different scopes, in order of specificity:
- Match — only this exact finding in this exact file
- Text — every finding with the same value (e.g. every occurrence of
123-45-6789) within the scan - File — every finding in this file
- Folder — every finding in every file under a directory, recursively
A match-scope verdict overrides text- and file-scope verdicts at the same location. This lets you make a broad call ("this whole vendor manifest is FP") and still confirm one match inside it as a real positive without un-marking the file.
A folder rule behaves like a file-scope verdict applied to each file underneath it, so the same override logic applies: a file you explicitly confirmed as a true positive keeps that verdict even when its parent folder is ignored, and any match- or text-scope verdict inside the folder wins over the folder rule.
Why four scopes
Most "ignore" features only let you hide a single finding at a time. That is unworkable when one developer test SSN appears 400 times across a repo, or when the same backup folder is scanned weekly. Text-scope says "this exact value is never PII in this scan, anywhere"; file-scope says "this file is noise, drop everything in it"; folder-scope says "this entire subtree (a vendor SDK, a backup directory, node_modules) is noise". Match-scope is the precise scalpel for the cases where none of the broad rules fit.
Path A: Triage in the TUI
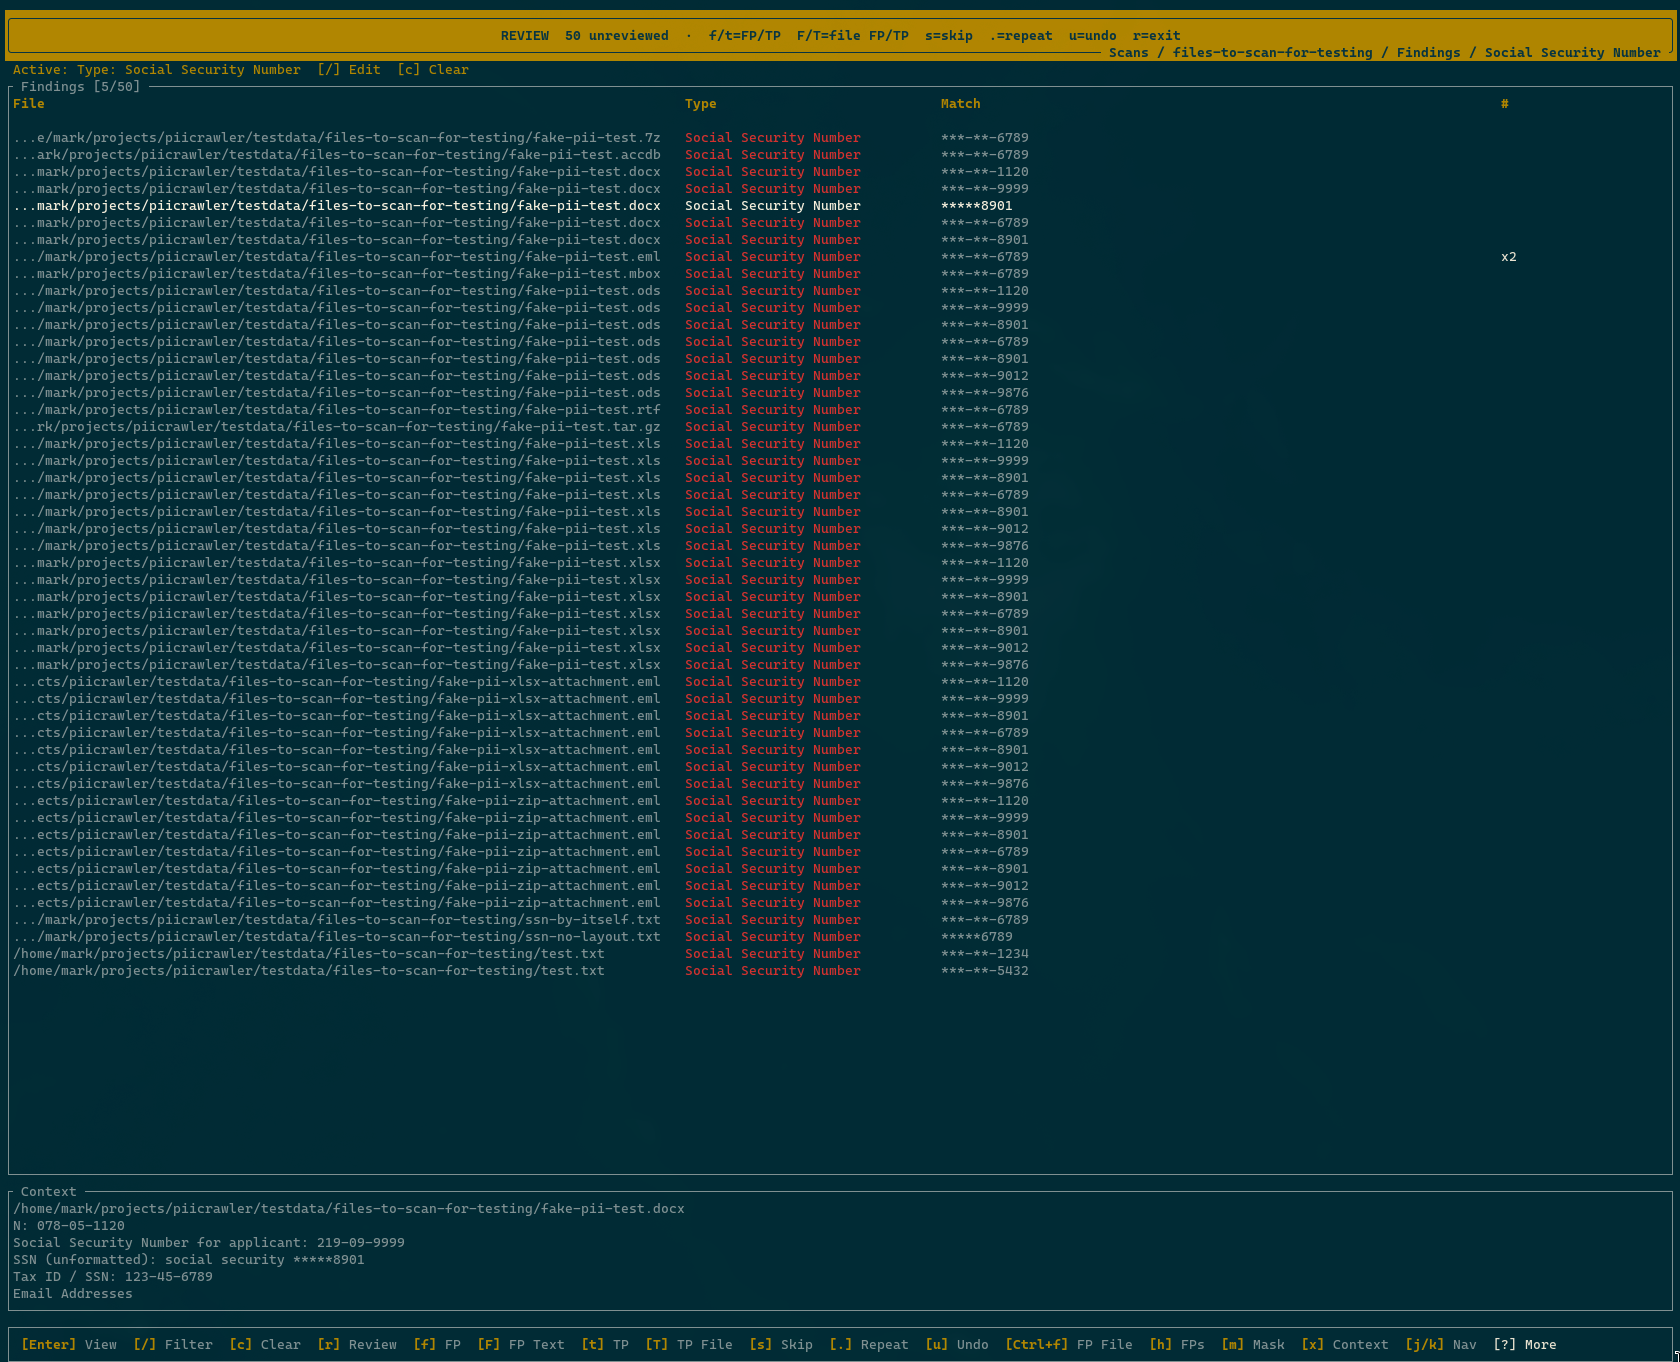
The TUI is built for fast keyboard-driven triage. From the scan list, press Enter to open a scan, then f to open Findings.
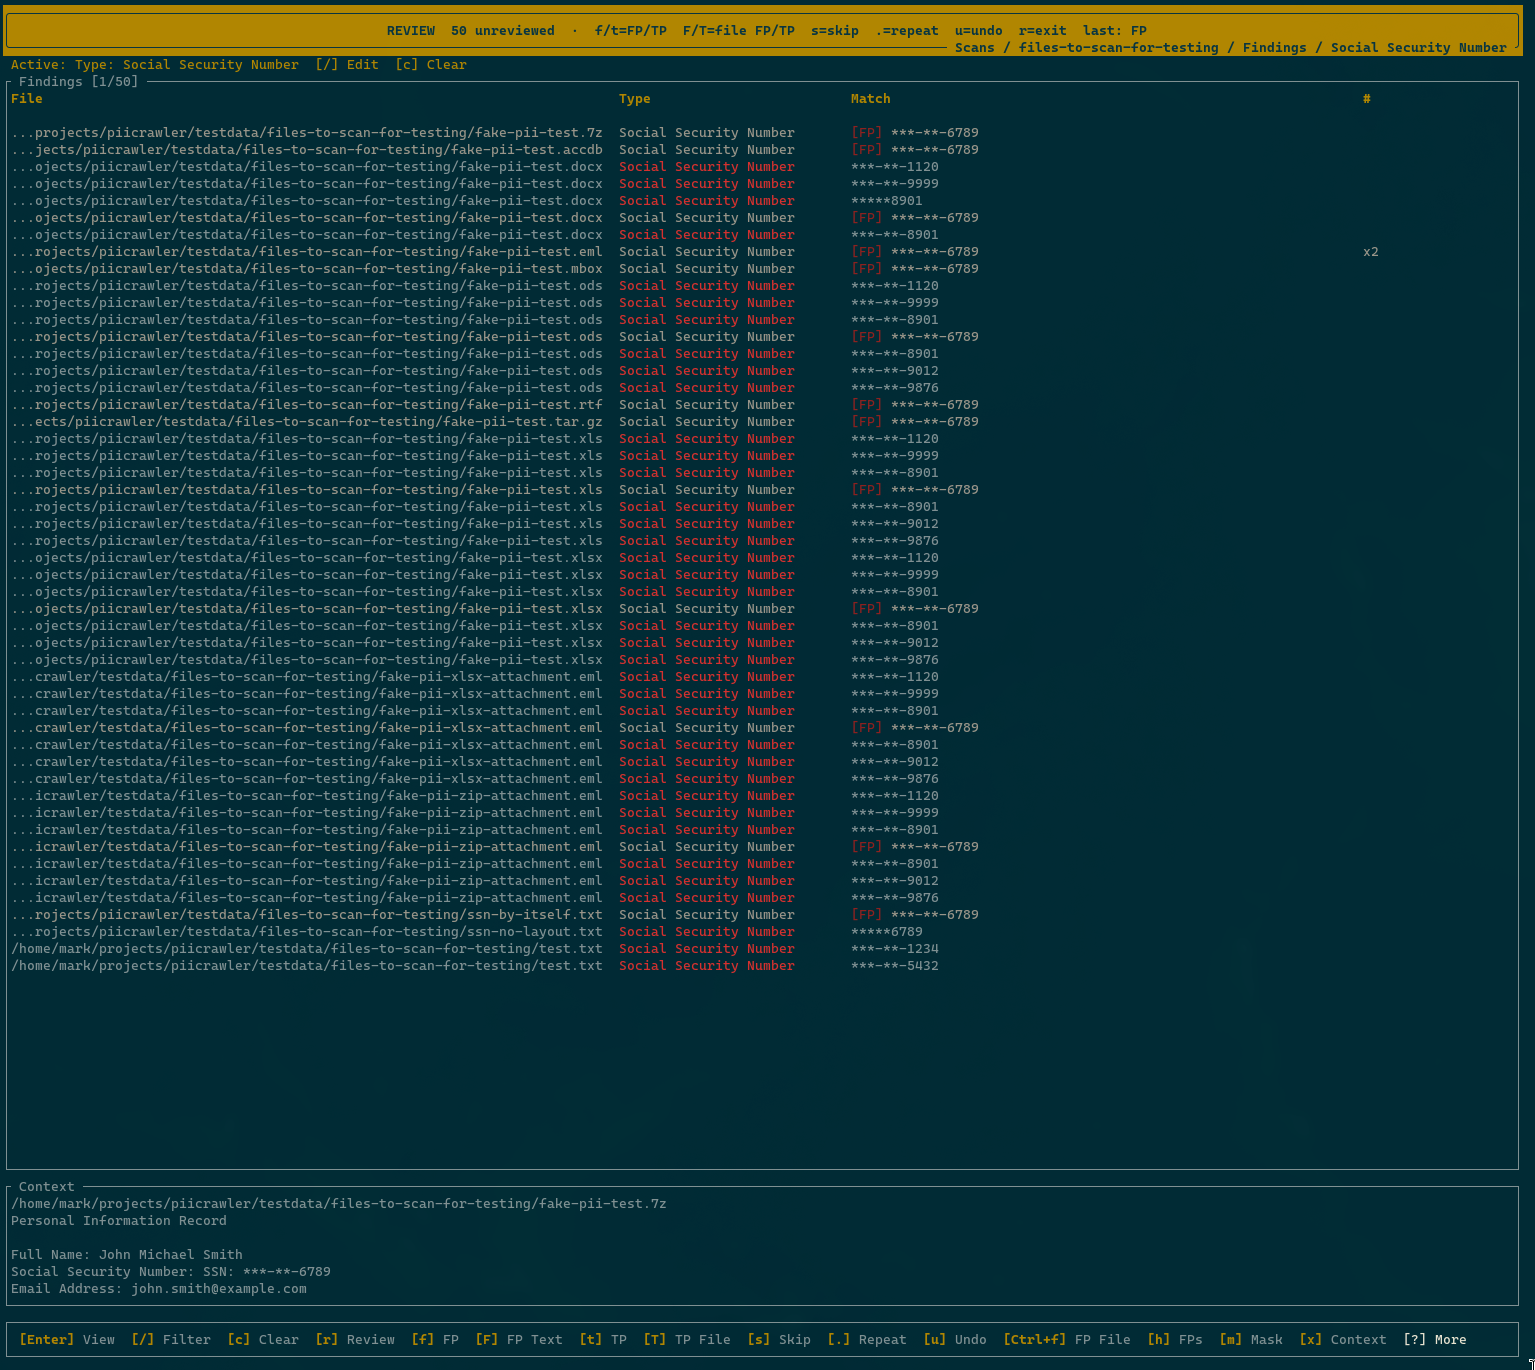
Review mode
The headline feature is Review mode (r). It pre-filters out anything you've already decided and walks you through the rest one group at a time, accepting single-key verdicts:
| Key | Verdict |
|---|---|
f |
False positive (auto-decides match vs. text scope, see below) |
t |
True positive |
F |
File false positive (every match in this file) |
T |
File true positive |
s |
Skip (no verdict, move on) |
. |
Repeat the last verdict |
u |
Undo the last verdict |
r |
Exit review mode |
Review mode picks the scope for f and t automatically. If the selected term only appears in one file in the current view, it applies a match-scope verdict. If the same (pii_type, term) appears across multiple files, it applies a text-scope verdict — one keypress triages every occurrence of that value at once. This is the right default for the most common case (a recurring placeholder or test value spread across a tree).
u is the safety net. If you mash f on something that turned out to be real, undo restores the prior verdict and puts the group back into the review queue.
When you're not in review mode
You can also triage without entering review mode:
f— mark the selected match as a false positiveF— mark the selected match's text (every occurrence) as a false positiveCtrl+f— mark the selected match's whole file as a false positiveh— toggle whether false positives are hidden or shown in the list
h is what you use to audit your own decisions: flip it on to see everything you've marked FP in case you need to revert one.
Filtering before you triage
The Findings view supports filters (/) by PII type, by match text, and by extension. A common pattern: filter to ssn only, then enter review mode. That way you triage one PII type at a time with full attention, instead of context-switching between credit cards and email addresses every keystroke.
Masking for screen sharing
If you're triaging on a call or recording a walkthrough, press m to mask findings on screen. SSNs collapse to ***-**-1234, emails to jo*****e@ex***le.com, and so on. The masking is display-only — the underlying data is unchanged.
Path B: Triage in the Web UI
If you'd rather work in a browser, run piicrawler serve and open http://localhost:3001. The Web UI exposes text-, file-, and folder-scope verdicts (match-scope is TUI-only):
- Mark across scan on each match group — text-scope verdict, hides every occurrence of that exact value across the scan
- Mark FP directly on any row of the Files list (hover over the filename, or press
fon the highlighted row) — file-scope verdict, hides every match in the file without opening it - Mark file as FP in the
⋯actions menu on the file detail page — the same file-scope verdict, for when you're already reading the file - Ignore all matches in this folder from any path segment in the Files list — folder-scope verdict, hides every match in every file under that directory
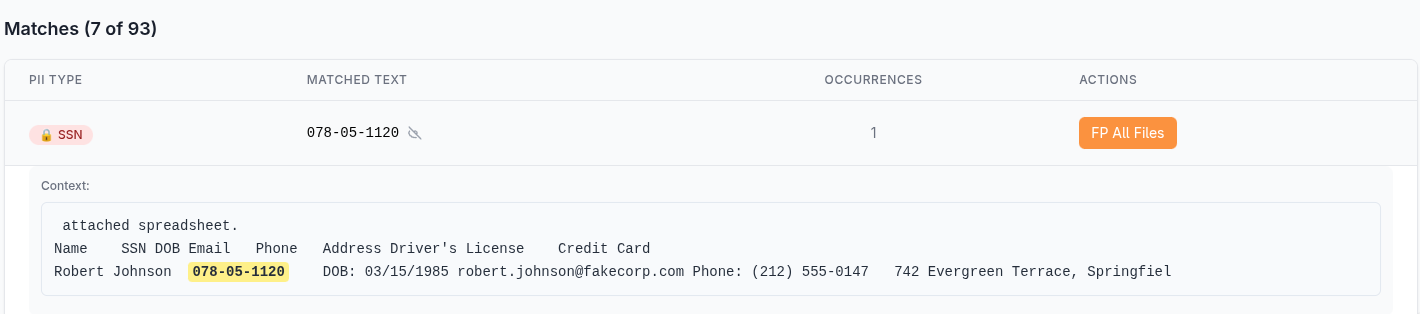
The Web UI is the right tool when you want to read the surrounding context of a match before deciding — each match group can be expanded to show the line of text it was extracted from, with the matched value highlighted. The first five groups expand by default; click the chevron next to a row to toggle context for the rest.
Keyboard triage in the Files list
The Files list works without the mouse. A highlighted row tracks your position, and the page remembers it: open a file, press Esc (or the browser back button), and you land back on the same row at the same scroll position.
| Key | Action |
|---|---|
j / ↓ |
Move the highlight down |
k / ↑ |
Move the highlight up |
Enter |
Open the highlighted file |
Space |
Preview the highlighted file's matches inline |
f |
Mark or unmark the highlighted file as a false positive |
x |
Select or deselect the highlighted file (bulk actions) |
/ |
Jump to the search box |
Esc |
Collapse the preview, clear the selection, leave the search box, or go back from a file's detail page |
Marking with f (or the Mark FP hover action) shows the usual Undo toast. With false positives hidden (the default), the row drops out of the list and the highlight lands on the next file, so clearing a run of noisy files is just f, f, f.
Previewing matches without leaving the list
Most files can be judged without opening them. Click the chevron at the start of any row, or press Space on the highlighted row, to expand the file's first few matches inline. Each one shows its PII type and the line of text it came from, with the matched value highlighted, so the usual rhythm becomes Space to peek, then f to dismiss or j to move on. View all at the bottom of the preview jumps to the full file detail page when a glance isn't enough.
Bulk selection in the Files list
Tick the checkboxes on several rows to act on them together: x toggles the highlighted row, Shift-click extends the selection from the last row you clicked, and the header checkbox selects the whole page. A bar appears above the table with Mark as FP and Unmark FP, which apply a file-scope verdict to every selected file in one request, with a single Undo for the whole batch. The selection survives paging, so you can collect files from several pages before acting.
Filters compose with bulk marking through Mark all N as FP at the end of the active-filters row. After a confirmation, it marks every file matching the current filters as a false positive: all pages, not just the visible one. Filter to .csv files under a test-fixtures folder, click once, and the whole family is gone. Files you have explicitly confirmed as true positives are never swept up, and the toast offers Undo here too.
Ignoring an entire folder
On the Files list, every file's path is interactive. Hover over the gray path under a filename and the directory segments highlight as you move along them; click a segment to open a small panel for that folder showing how many live matches and files sit underneath it, with two actions:
- Ignore all matches in this folder marks everything under that directory (recursively, including files inside zip archives there) as false positives in one click. A toast with Undo appears, and the folder shows as Ignored if you reopen the panel, where you can Un-ignore this folder at any time.
- Filter list to this folder narrows the Files list to just that directory, which composes with the PII type, text, and extension filters. Useful for reviewing a suspect subtree before deciding to ignore it wholesale.
Files you have explicitly marked, at any scope, keep their verdicts: ignoring a folder never overrides a file you confirmed as a true positive. The folder rules you create are listed alongside other false positives in the scan's false-positive records, so they are easy to audit and reverse later.
False-positive visibility in the Files list
Files marked as false positives (directly or via a folder rule) are hidden from the Files list by default, so ignoring a folder visibly clears it from the list. The False positives control above the table switches between three views:
- Hidden (default) — only files still in play
- Shown — everything, with false-positive files tagged in orange
- Only — just the false-positive files, the place to audit past decisions or un-ignore a folder you no longer want suppressed
The setting is part of the page URL, so a shared link keeps the view you were looking at.
Every active filter, including the folder, status, and false-positive visibility settings, shows as a removable chip in the Active row of the filter panel. One glance shows exactly what is narrowing the list, any single filter clears with its ✕, and Clear all resets the page.
Combining PII type filters
When you pick more than one PII type, a small match all / any toggle appears next to the type chips:
- all (default) lists only files that contain every selected type. Choosing
ssnandcredit-cardfinds files with both, the way to surface the highest-stakes records. - any lists files that contain at least one of the selected types, the union of all of them.
The Risk Summary on the scan detail page links straight into this view. Clicking high-risk opens the Files list filtered to every high-risk PII type with the toggle set to any, so you see all files that carry any high-risk data rather than the rare file that happens to hold all of them at once. The toggle is part of the page URL, so a shared link keeps the same combination.
Triaging in bulk
The match table on the file detail page supports bulk selection. Tick the checkboxes next to several rows (or the header checkbox to select every row on the current page), and the bar above the table reveals Mark across scan, which applies a text-scope verdict to every selected term in one request. Use the search box above the table to narrow the list to a substring (gmail, 123-45-6789, etc.) before bulk-marking — particularly useful when an entire family of terms shares the same noise pattern.
Every false-positive action shows a toast in the bottom-right corner with an Undo button for ~6 seconds, so a misclick is one click to reverse. Use the TUI's Review mode when you've already decided the heuristic and just want to grind through the queue.
The full three-scope dropdown (This finding / All "[term]" / [Name] + [type]) is exposed on PII Identity Scan results — see PII Identity Scan. Regular scan findings in the Web UI use the two scopes above.
Exporting a clean report
Once you've worked through the list, you'll usually want a CSV that contains only the true positives.
From the CLI: piicrawler export <scan_id> --exclude-fp --out findings.csv writes the same CSV from the command line, leaving out FP-marked findings. The export streams row by row, so it handles scans with millions of findings without breaking a sweat — the best route for very large scans. See export for details.
From the TUI: in the scan detail view, press e to export. The export honours your show / hide false positives toggle (h). Hide false positives first (the default), then export — the resulting CSV will have FP-marked findings filtered out.
From the Web UI: the CSV download on the scan detail page includes all findings regardless of FP state. Filter in your spreadsheet, or use the CLI or TUI export when you need a pre-filtered file.
Per-file CSV from the Web UI: the file detail page (View Files → click a row) has a kebab menu in the file header with Download matches as CSV. The download respects the active Filter by PII Type chips, so to grab only the email matches for one file, click the email chip first, then open the menu — the item updates to Download CSV (email) and the resulting file contains just those rows.
From the database: every scan's data lives in the shared SQLite file at ~/.piicrawler/piicrawler.db (filter by scan_id to scope a query to a single scan). Two queries that come up a lot:
Count remaining true positives by PII type, after triage:
SELECT m.pii_type, COUNT(*) AS n
FROM scan_matches m
WHERE m.scan_id = ?
  AND NOT EXISTS (
    SELECT 1 FROM scan_false_positives fp
    WHERE fp.scan_id = m.scan_id
      AND fp.verdict = 'false_positive'
      AND (
        (fp.scope = 'match' AND fp.match_id = m.id)
        OR (fp.scope = 'text' AND fp.pii_type = m.pii_type AND fp.term = m.term)
        OR (fp.scope = 'file' AND fp.file_id = m.file_id)
      )
  )
GROUP BY m.pii_type
ORDER BY n DESC;
Files that are entirely false positives (nothing left to act on):
SELECT f.path
FROM scan_files f
JOIN scan_false_positives fp
  ON fp.scan_id = f.scan_id
 AND fp.scope = 'file'
 AND fp.file_id = f.id
 AND fp.verdict = 'false_positive'
WHERE fp.scan_id = ?;
See Results Storage for the full schema.
A workflow that scales
For large scans (10,000+ matches), order matters. Triaging top-down by file is much faster than triaging by match, because most noise concentrates in a few directories.
- Start at folder and file scope. Most noise concentrates in a few directories:
node_modules, vendor SDKs, test fixtures, backups. In the Web UI Files list, click a path segment and Ignore all matches in this folder to clear a whole subtree at once. In the TUI, open the Files view (lfrom scan detail) and mark noisy files FP at file scope (F). This usually removes 60–80% of findings in one pass. - Then go to text scope. Sort findings by frequency. The top of the list is almost always recurring placeholder values (
123-45-6789,[email protected], lorem-ipsum addresses). Mark those FP at text scope (Fin the Findings list, orfinside review mode when it auto-decides text scope). - Finally, review what's left in review mode. What remains should be the genuinely interesting findings — small enough to walk through one keypress at a time.
- Export and hand off. Hide false positives (
h), export CSV (e), and you have a clean list to attach to a ticket, a DSAR response, or a compliance report.
Re-running scans
When the scan is re-run (a watched directory updates, or you re-trigger the scan manually), text-, file-, and folder-scope FP rules are reapplied automatically — a new occurrence of an already-marked text value comes back already classified, and a new file discovered under an ignored folder is ignored from the start. Match-scope verdicts only apply to the specific match they were created for, so a new instance of "the same finding" in a re-extracted file will appear as Unreviewed again. This is intentional: the cheap rules generalise, the precise rules don't.
See also
- Agentic Triage — drive the same verdict model from an LLM via
piicrawler findings - PII Identity Scan — has its own per-run false-positive workflow scoped to identity associations
- DSAR Walkthrough — turn the same triaged data into a person-centric report
- Results Storage — schema for the false-positive tables, useful for custom queries
- CLI Reference —
piicrawler dsarfor cross-scan searches over the same triaged data